Installation Instructions for TRIM
1. Installation of third party software
1.1 Install the Java Runtime Environment (JRE) 1.5 or later
1.2 Install R version 2.1.0 or later
1.3 Install MySQL Version 4.1
2. Installation of TRIM (temporarily unavailable)
2.1 Installing TRIM for the First Time
2.2 Updating Your TRIM Installation
3. Installation of TRIM.FaTE in stand-alone mode
3.1 Installing TRIM.FaTE
3.2 Updating TRIM.FaTE
3.3 Troubleshooting TRIM.FaTE
1. Installation of third party software
TRIM.FaTE needs the following third party software to run: Java 1.5 or later, R version 2.1.0 or later, and MySQL Server 4.1 (later versions of MySQL are not compatible with TRIM.FaTE). Make note of all passwords and usernames you create during the installation process, as well as the location of program directories when you install Java, R, and MySQL.
1.1 Install Java 1.5 or later
- Note: Many people already have Java installed on their computers. If you have version 1.5 or later, you do not need to upgrade. If you do not have Java or if you want to upgrade your current version, follow these steps.
- Visit the Java download page at https://java.com/en/download/index.jsp
- Click on the button, Free Java Download and then Agree and Start Free Download
- Once the download finishes, install Java.
- At the first Java Setup screen, uncheck the boxes for “Set and keep Ask as my default search provider” and “Set and keep Ask.com as my browser home page and new tabs page” unless you want to install these for personal use. Their installation does not impact the installation or execution of TRIM.FaTE. Click Next to install Java.
1.2 Install “R” Version 2.1.0 or later
- Select the link Download R X.X.X for Windows in the upper left corner of the screen (X.X.X being the version number).
- Select either Run when prompted to automatically run the installer, or select Save to save the installer to a directory of your choice.
- If you selected Save, navigate to the directory you saved the installer to and double-click the file to run the installer.
- Make a note of the directory into which R was installed (e.g. C:\Program Files\R\R-3.3.1). You will need this information later in your TRIM.FaTE installation process. When the installation is complete, click Finish.
1.3 Install MySQL Server 4.1 (vers 4.1 is no longer available and TRIM.FaTE is not compatible with versions of MySQL later than 4.1)
2.0 Installation of TRIM (temporarily unavailable)
3. TRIM.FaTE Installation
An installer has been developed for TRIM.FaTE to streamline the download and installation process. The installer will install all files necessary to run TRIM.FaTE, will assist you in configuring TRIM.FaTE, and will set up a shortcut to allow you to run TRIM.FaTE. TRIM.FaTE installers for 32-bit and 64-bit systems are available at section 3 (Software Available for Download) on the TRIM Installation page.
3.1 Installing TRIM.FaTE
- Two versions of a TRIM.FaTE installer are available: one for a 32-bit system and one for a 64-bit system. Select the download file that matches your system. To determine your system type, go to your Windows Start menu, select Control Panel, and then System. For 32-bit systems select [TRIM.FaTE_Installer_x86.exe], and for 64-bit systems select [TRIM.FaTE_Installer_x64.exe]. Perform the following steps to install TRIM.FaTE onto your computer.
- Download the appropriate TRIM.FaTE Installer to your computer. You can place the installer at any convenient location on your computer (after TRIM.FaTE has been successfully installed, you can delete the installer from your computer).
- Once you have downloaded the installer, double-click it to launch. When the installer starts, you will see a screen labeled “Setup – TRIM.FaTE”. Follow these steps to set up the installer:
- Click on the Next button. You will see a page that allows you to specify a location for the installer (default is C:\Models\TRIM). If you wish to specify a different location, you may type into the field or use the Browse button. Once you are satisfied with the location of the installer, click the Next button.
- You can now select a shortcut for TRIM.FaTE on the Start menu folder. Note that this option will create a shortcut for the TRIM.FaTE Installer, not for TRIM.FaTE; therefore it is recommended you check the box “Don’t create a Start menu folder”. Once you are satisfied with your selections click the Next button.
- If you are satisfied with your selections, click the Install button. Otherwise, click the Back button to review and change any settings. The Installer now will unpack the TRIM.FaTE files into your specified directory.
- After the TRIM.FaTE files have been extracted, the Setup Wizard will ask you if you want to Launch TRIM.FaTE. It is recommended that you select Yes. Then select Finish. This will launch the configuration window that allows you to configure TRIM.FaTE. (If you wish to configure and launch TRIM.FaTE at a later time, see the instructions for updating TRIM.FaTE below.)
- There will be a series of text boxes where you will provide the directories, user names, and passwords that TRIM.FaTE needs to know. For each required field, the installer provides a likely directory path. Note that this is only a likely location – in most cases these directory paths will be correct, but you need to confirm that is the case. Differences between 32-bit and 64-bit programs can cause differences in locations. Please make sure you select the 32-bit version of any required program. Sections I through VI below provide information for each of the configuration steps.
- “Enter TRIM Home Folder”
- Enter the install directory for TRIM.FaTE. This is the location you entered in Step 2.1.c (above). The default directory is C:\Models\TRIM. If you installed TRIM.FaTE to another location, open Windows Explorer and find the TRIM directory and navigate to the TRIM folder. In the navigation bar at the top of the explorer window, click to the right of the folder paths. This will provide you with the directory you can copy and paste into the installation text box (see image below).
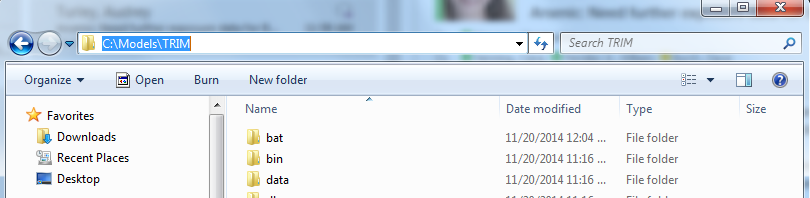
- Enter the install directory for TRIM.FaTE. This is the location you entered in Step 2.1.c (above). The default directory is C:\Models\TRIM. If you installed TRIM.FaTE to another location, open Windows Explorer and find the TRIM directory and navigate to the TRIM folder. In the navigation bar at the top of the explorer window, click to the right of the folder paths. This will provide you with the directory you can copy and paste into the installation text box (see image below).
- Enter MySQL Bin Path
- This is the “bin” folder in the directory in which you installed MySQL Server 4.1. The default install directory is C:\Program Files (x86)\MySQL\MySQL Server 4.1\bin. If you installed MySQL Server 4.1 to another location, open Windows Explorer and locate the MySQL directory and navigate as follows: MySQL à MySQL Server 4.1 à bin. In the navigation bar at the top of the explorer window, click to the right of the folder paths. This will provide you with the directory you can copy and paste into the installation text box (See image below).

- This is the “bin” folder in the directory in which you installed MySQL Server 4.1. The default install directory is C:\Program Files (x86)\MySQL\MySQL Server 4.1\bin. If you installed MySQL Server 4.1 to another location, open Windows Explorer and locate the MySQL directory and navigate as follows: MySQL à MySQL Server 4.1 à bin. In the navigation bar at the top of the explorer window, click to the right of the folder paths. This will provide you with the directory you can copy and paste into the installation text box (See image below).
- Enter MySQL Username
- MySQL allows users to define a username; although it is not necessary to run TRIM.FaTE. If you established a username for MySQL then enter it here. The Installer automatically populates with the default of “root”. Please use the default of “root” if you did not establish a username.
- MySQL allows users to define a username; although it is not necessary to run TRIM.FaTE. If you established a username for MySQL then enter it here. The Installer automatically populates with the default of “root”. Please use the default of “root” if you did not establish a username.
- Enter MySQL Password
- Enter the MySQL password you created during the MySQL Server 4.1 installation. If you do not remember your password, you will need to cancel the TRIM.FaTE setup, uninstall and reinstall MySQL (noting the password), and then proceed to “Updating TRIM.FaTE” and follow the directions.
- Enter the MySQL password you created during the MySQL Server 4.1 installation. If you do not remember your password, you will need to cancel the TRIM.FaTE setup, uninstall and reinstall MySQL (noting the password), and then proceed to “Updating TRIM.FaTE” and follow the directions.
- Enter R Bin Path
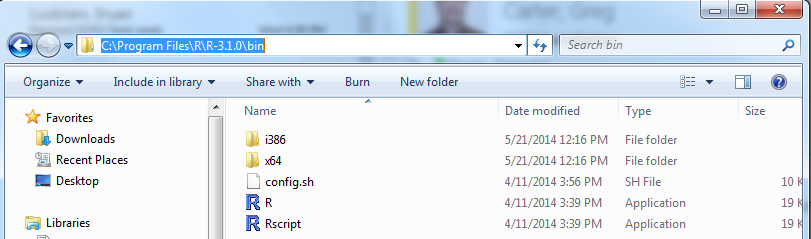
- This is the “bin” folder in the directory in which you installed R. The installer defaults to the directory C:\Program Files\R\R-3.1.2\bin. Please note that your version number might be different than the default and will require you to update the directory. Also, if you installed R to another location you will need to update the directory. To update the directory, open Windows Explorer and find the R directory and navigate as follows: R -> R-3.1.2 (or the version number you installed) -> bin. In the navigation bar at the top of the explorer window, click to the right of the folder paths. This will provide you with the directory you can copy and paste into the installation text box (See image below).

- This is the “bin” folder in the directory in which you installed R. The installer defaults to the directory C:\Program Files\R\R-3.1.2\bin. Please note that your version number might be different than the default and will require you to update the directory. Also, if you installed R to another location you will need to update the directory. To update the directory, open Windows Explorer and find the R directory and navigate as follows: R -> R-3.1.2 (or the version number you installed) -> bin. In the navigation bar at the top of the explorer window, click to the right of the folder paths. This will provide you with the directory you can copy and paste into the installation text box (See image below).
- Enter Java Bin Path
- This is the “bin” folder in the directory in which you installed Java. The installer defaults to the directory C:\Program Files (x86)\Java\jre1.8.0\bin. Please note that your version number might be different than the default and will require you to update the directory. Also note that you might find Java installed to both your “C:\Program Files” and “C:\Program Files (x86)” directories. If this is the case, please select the folder in the “C:\Program Files (x86) directory. If you installed Java to another location, open Windows Explorer, find the Java directory and navigate as follows: Java -> jre1.8.0_25 (or the version number you installed) -> bin. In the navigation bar at the top of the explorer window, click to the right of the folder paths. This will provide you with the directory you can copy and paste into the installation text box (see image below).
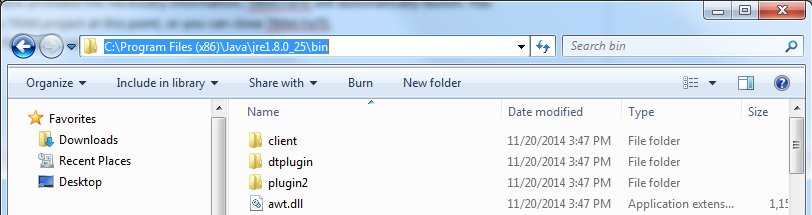
- This is the “bin” folder in the directory in which you installed Java. The installer defaults to the directory C:\Program Files (x86)\Java\jre1.8.0\bin. Please note that your version number might be different than the default and will require you to update the directory. Also note that you might find Java installed to both your “C:\Program Files” and “C:\Program Files (x86)” directories. If this is the case, please select the folder in the “C:\Program Files (x86) directory. If you installed Java to another location, open Windows Explorer, find the Java directory and navigate as follows: Java -> jre1.8.0_25 (or the version number you installed) -> bin. In the navigation bar at the top of the explorer window, click to the right of the folder paths. This will provide you with the directory you can copy and paste into the installation text box (see image below).
- “Enter TRIM Home Folder”
- After you have provided the necessary information, TRIM.FaTE will automatically launch. You can begin a TRIM project at this point, or you can close TRIM.FaTE.
- To launch TRIM.FaTE after installation, perform the following steps:
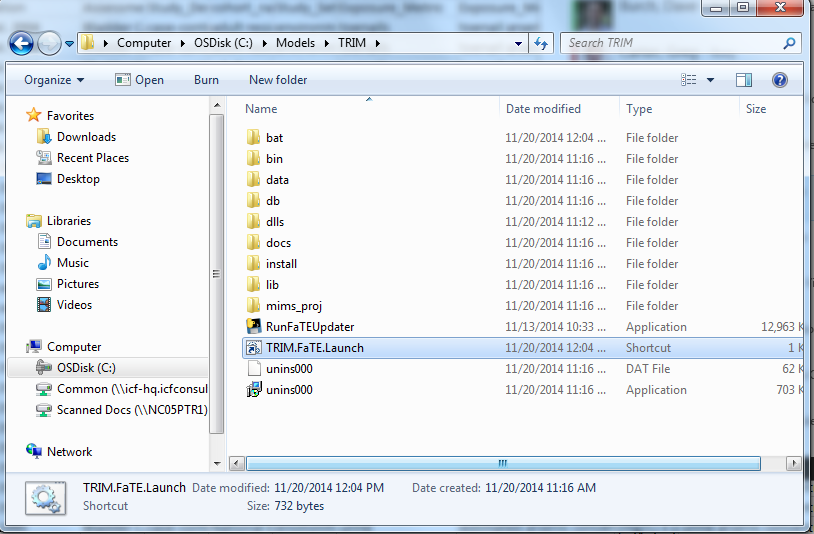
- Open Windows Explorer and navigate to the TRIM folder you designated. Double-click on the TRIM.FaTE.Launch shortcut in order to launch TRIM.FaTE (see image below).

- If you would like to move this shortcut to the desktop simply copy it from the TRIM folder and paste it onto your desktop. You can also move this shortcut to any file location on your computer you would like.
- Open Windows Explorer and navigate to the TRIM folder you designated. Double-click on the TRIM.FaTE.Launch shortcut in order to launch TRIM.FaTE (see image below).


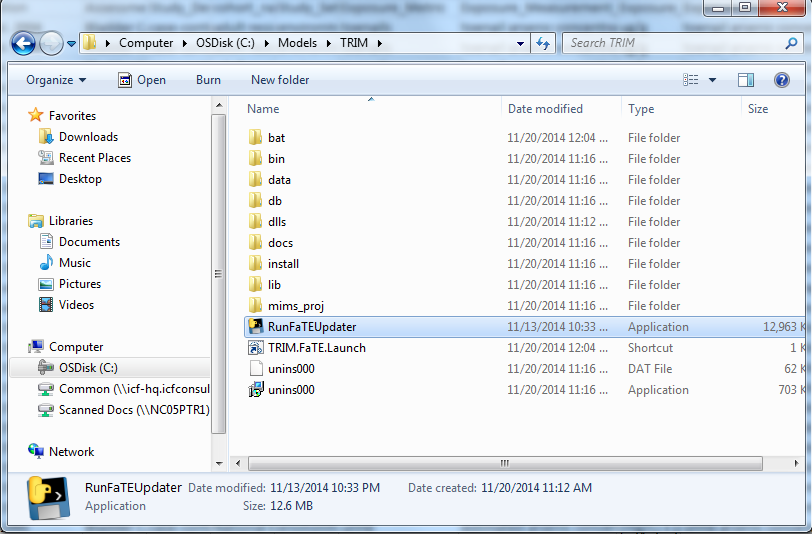
3.2 Updating TRIM.FaTE
In order to update TRIM.FaTE, or if you chose not to configure TRIM.FaTE on install, you will need to open Windows Explorer and navigate to the TRIM folder and double-click on the RunFaTEUpdater to update TRIM.FaTE (see image below). This will require you to re-enter the directory and MySQL information from step 4 (Setup).
3.3 Troubleshooting TRIM.FaTE
- Users with advanced security settings and/or operating on certain versions of Windows may potentially find their installation interrupted by a message to the effect that “elevation is required.” This message refers to advanced administrator privileges. In this situation, users should navigate to the installation directory (e.g. C:\Models\TRIM) and manually double-click on the RunFaTEUpdater file and proceed with configuring TRIM.FaTE as described above.
- Having successfully launched and operated TRIM.FaTE, users may find the application failing to launch, usually following the passage of a period of time. This usually indicates that the user’s computer has updated its setting for either Java, R, or MySQL. In this situation, users should navigate to the installation directory (e.g. C:\Models\TRIM) and double-click on the RunFaTEUpdater file and proceed with configuring TRIM.FaTE per their current versions of Java, R, and MySQL.
- If users find that TRIM.FaTE launches but does not work (for instance, the user cannot open TRIM.FaTE libraries or projects) it might be a sign that the user is operating on a 64-bit computer and has not directed the TRIM.FaTE installer to the 32-bit version of Java. Users should reconfigure TRIM.FaTE, using the RunFaTEUpdater, with the correct directory path for 32-bit Java and 32-bit versions of R and MySQL as well.
- If, even after following the instructions above, TRIM.FaTE launches but users are not able to open TRIM.FaTE libraries or projects, it suggests a one-time initialization error that may be associated with certain Java releases and hardware configurations. If this problem occurs, in the TRIM.FaTE window navigate to the File -> Preferences menu. Under “Paths”, for both the User path and the TRIM path fields, input the full path to the TRIM home folder (set in section 2.1 part 2a; typically C:\Models\TRIM). Under “Database Setup”, input the MySQL username (root, unless you specified a different MySQL username) for the User Name field, and the corresponding root password for the Password field. Users will now be able to open TRIM library and project files in all future launches of TRIM.FaTE.
3.3.1 Reconfiguring an Instance of MySQL Server 4.1
- If you have been prompted on installation of MySQL Server 4.1 to Modify, Repair, or Remove your installation or if during configuration you have been prompted to Reconfigure Instance or Remove Instance, then you already have a MySQL Server 4.1 Instance on your computer. If you do not remember your password and need to set a new one, complete the following steps. Please be sure to read carefully as there are multiple required steps in this process.
- Open the MySQL Server Instance Configuration Wizard in the Start menu under All Programs->MySQL->MySQL Server 4.1.
- Select Remove Instance and continue through the removal process.
- Reopen the MySQL Server Instance Configuration Wizard in the Start menu under All Programs->MySQL->MySQL Server 4.1.
- Choose Detailed Configuration for the configuration type and then click Next. When prompted, choose the following options in the wizard:
- Determine your system type. Go to your Windows Start menu, select Control Panel, and then System. Look under System Type to see whether you have a 32-bit or 64-bit operating system.
- For a 64-bit operating system, you need to select Developer Machine.
- For a 32-bit operating system, select Server Machine.
- Click Next after making your selection.
- Select the Non-Transactional Database Only option
- Select the Manual Setting option and set the number of concurrent connections to be 15.
- Make sure the Enable TCP/IP Networking is checked, and select the default port setting (3306).
- Select Standard Character Set.
- Make sure the Install as Windows Service and the Launch the MySQL Server automatically checkboxes are checked and select “MySQL” as the Service Name.
- Check the Include Bin Directory in Windows PATH checkbox.
- On the following page that starts with “Please set the security options,” check the Modify Security Settings checkbox, enter a new root password and Confirm.
- Write down the new password you created.
- Do not check Enable root access from remote machines (this is a security risk).
- Leave the Create an Anonymous Account option unchecked.
- On the “Ready to Execute” page, click the Execute button.
- You will then get an error message. This is due to a password issue. To resolve this, complete the following steps.
- Click Skip on the error message, then Cancel out of the configuration.
- Go to the Start menu -> Control Panel -> Administrative Tools -> Services.
- Under Service(Local) find the MySQL entry. Right-click this entry, if available, and select Stop.
- Open the MySQL Server Instance Configuration Wizard on the Start menu under All Programs->MySQL->MySQL Server 4.1
- Select Reconfigure Instance and make the same selections you made directly above, with one exception.
- Do Not select the Modify Security Settings checkbox. You should not reenter a new password.
- Do Not select the Modify Security Settings checkbox. You should not reenter a new password.
- This time the instance should execute without error.
- Proceed to the “TRIM.Fate Installation” section.
- Open the MySQL Server Instance Configuration Wizard in the Start menu under All Programs->MySQL->MySQL Server 4.1.