Lean & Water Toolkit: Chapter 3
Finding Water Waste on the Factory Floor
- Water Gemba Walks
- Developing a Water Balance
- Water Waste and Value Stream Mapping
- Root Cause Analysis
- To Consider
- Footnotes
- Toolkit Navigation
Some of the most substantial reductions in water use can be found right on the factory floor. This chapter describes several simple techniques to foster an understanding of where water goes in a facility and where it can be saved. While all of these techniques evaluate aspects of facility water use and can support your Lean efforts, each has a different level of detail, time, and staff investment required—ranging from a facility walk to a multi-day value stream mapping event. Consider the level of effort desired before getting started to conduct the most effective analysis for your facility’s needs.
Water Gemba Walks
![]()
![]() A useful way to identify ways to reduce water consumption is a “gemba walk.” A water gemba walk is an exercise in which employees and managers walk the factory floor together to observe and inventory inefficiencies related to water use. Gemba is a Japanese term meaning “the real place;” in the context of Lean manufacturing, gemba typically refers to the place where work happens (e.g., factory floor). Water gemba walks enable a team to quickly locate “low-hanging fruit” that save water at a small cost. They help facilities to:
A useful way to identify ways to reduce water consumption is a “gemba walk.” A water gemba walk is an exercise in which employees and managers walk the factory floor together to observe and inventory inefficiencies related to water use. Gemba is a Japanese term meaning “the real place;” in the context of Lean manufacturing, gemba typically refers to the place where work happens (e.g., factory floor). Water gemba walks enable a team to quickly locate “low-hanging fruit” that save water at a small cost. They help facilities to:
- Identify major sources of water loss, such as leaks, that can be repaired for significant savings
- Acquire a more complete understanding of the major end uses of water and flows of water in the facility than can be achieved solely by analyzing water utility bills
- Instill floor managers and workers with the importance of looking for and noticing leaks and inefficiencies, helping to create a culture of water efficiency
Before you conduct your gemba walk, first, determine the purpose and scope of the walk. How large an area will the walk cover, and how long will it take? How long will the team look at certain aspects of plant operations? What information or data would equip the team to best see wastes and opportunities? Second, obtain copies of relevant documents and data, including the last year of water utility bills or water consumption logs, the floor plan of the facility if available, and process diagrams for focus areas. Third, select the members of the gemba walk team. A small team is best, with approximately five to seven people constituting an ideal team size. Include workers and managers familiar with the area, outsiders, new employees and veterans, as well as an EHS representative in order to get a diversity of perspectives. A brief training can orient your team to the purpose of a gemba walk and help them feel empowered to spot wastes throughout the walk.
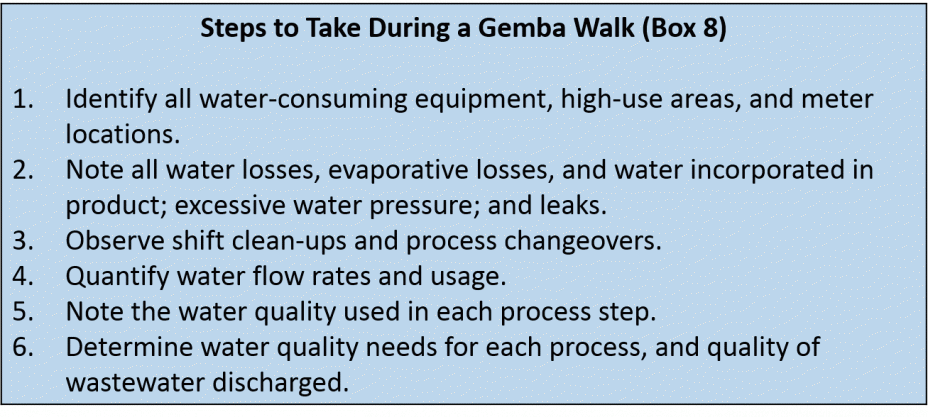
![]() Once you have your team assembled, use the Steps to Take During a Gemba Walk in Box 8 to find water waste and improvement opportunities at your facility.
Once you have your team assembled, use the Steps to Take During a Gemba Walk in Box 8 to find water waste and improvement opportunities at your facility.
 When employees are engaged and interested in finding wastes and identifying ways to improve water efficiency, the benefits of your gemba walk can continue well beyond the exercise itself. The training that your employees receive to conduct a gemba walk, or other Lean exercises, combined with immediate engagement in the exercises themselves, can help to create a culture in which employees routinely seek out ways to improve water efficiency.
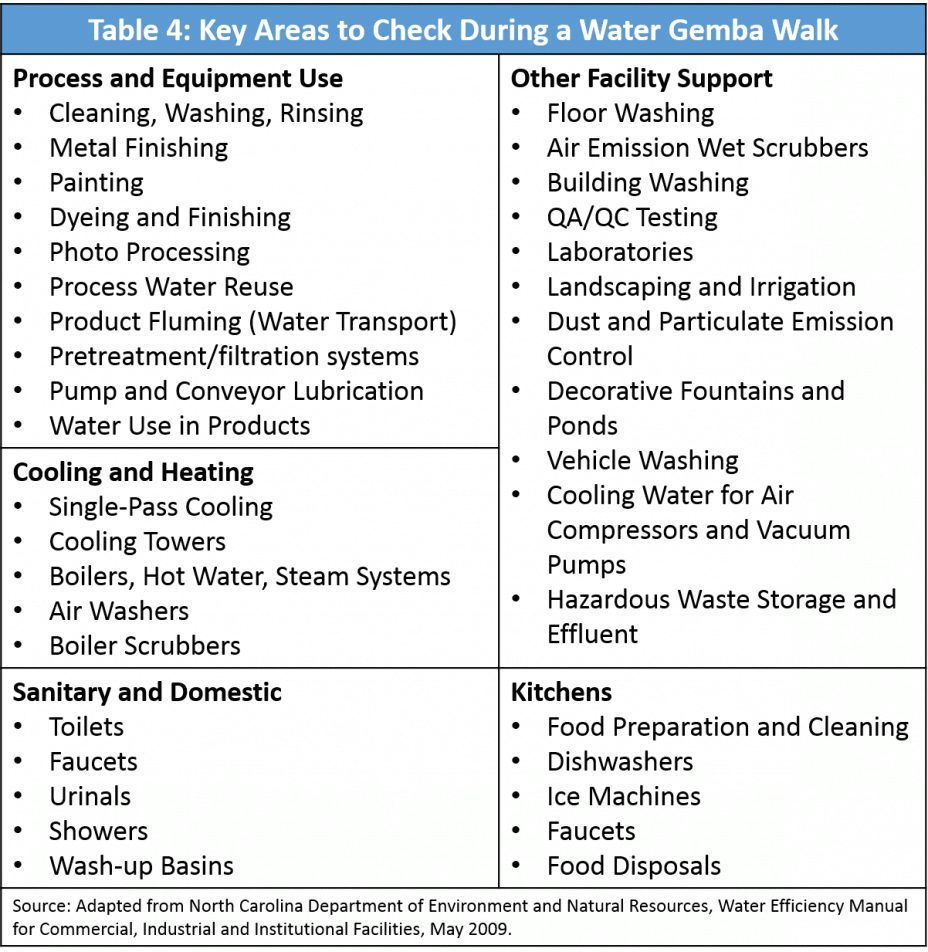
Consider conducting your gemba walk during a time when the facility is shut down, as this can be a good time to find unexpected losses. You can also collect data during your gemba walk on the nature of the water in use at various steps throughout each process; knowing when ![]() treated water is necessary and when lower-quality water might be okay will help you identify reuse opportunities later. Table 4, Key Areas to Check During a Water Gemba Walk, lists several common areas in industrial facilities in which water inefficiencies can be observed during a gemba walk.
treated water is necessary and when lower-quality water might be okay will help you identify reuse opportunities later. Table 4, Key Areas to Check During a Water Gemba Walk, lists several common areas in industrial facilities in which water inefficiencies can be observed during a gemba walk.
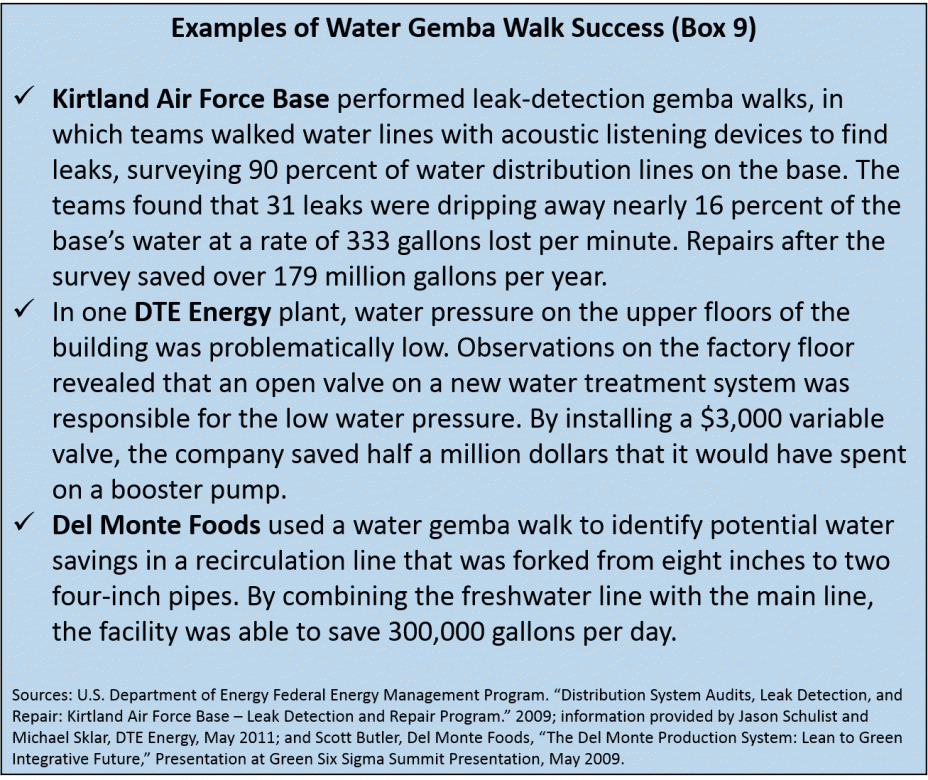
![]() Leak detection during a gemba walk can be one of the best low-cost, high-yield steps for reducing water waste in a facility. Leaks exist in all facilities, and can result in water loss ranging from a fraction of a percent of a facility’s total water use all the way up to a substantial portion. Low water pressure, dirty water, and a high quantity of water that cannot be accounted for are all signs of a leak. Bluing tablets or dyes can be used to easily check for leaks in tanks, toilets, or other water holding vessels. Sonic or acoustic leak detection equipment can be used to check for leaks in underground pipes. A simple drip gauge can help you conduct a basic estimate of how much water is lost due to a leak. Many leaks can be repaired with simple measures such as tightening or replacing fittings1. In some cases, it may be best to enlist the services of a professional leak-detection company to identify more complex leaks.
Leak detection during a gemba walk can be one of the best low-cost, high-yield steps for reducing water waste in a facility. Leaks exist in all facilities, and can result in water loss ranging from a fraction of a percent of a facility’s total water use all the way up to a substantial portion. Low water pressure, dirty water, and a high quantity of water that cannot be accounted for are all signs of a leak. Bluing tablets or dyes can be used to easily check for leaks in tanks, toilets, or other water holding vessels. Sonic or acoustic leak detection equipment can be used to check for leaks in underground pipes. A simple drip gauge can help you conduct a basic estimate of how much water is lost due to a leak. Many leaks can be repaired with simple measures such as tightening or replacing fittings1. In some cases, it may be best to enlist the services of a professional leak-detection company to identify more complex leaks.
Box 9 lists some examples of successful gemba walk and leak detection efforts.
Developing a Water Balance
While a gemba walk will help you identify potential water-savings opportunities, developing a water balance will give you a more thorough picture of overall water use at your facility. A water balance is a high-level, simple assessment of the input and output of water in your facility that can help to identify opportunities for improving water efficiency. A water balance might be appropriate for your facility, especially if you are just beginning your journey with Lean and water and have not conducted a more detailed water audit.
![]() A water balance is a chart, table, or diagram of a facility’s water use that shows the flows of water into and out of each process or operation in the facility. It typically includes every water-consuming component on-site and all flows out of the facility. A water balance can also include data on the cost of water. Figure 8 illustrates the fundamental approach to developing a water balance. Water balances can also be developed as part of value stream maps.
A water balance is a chart, table, or diagram of a facility’s water use that shows the flows of water into and out of each process or operation in the facility. It typically includes every water-consuming component on-site and all flows out of the facility. A water balance can also include data on the cost of water. Figure 8 illustrates the fundamental approach to developing a water balance. Water balances can also be developed as part of value stream maps.
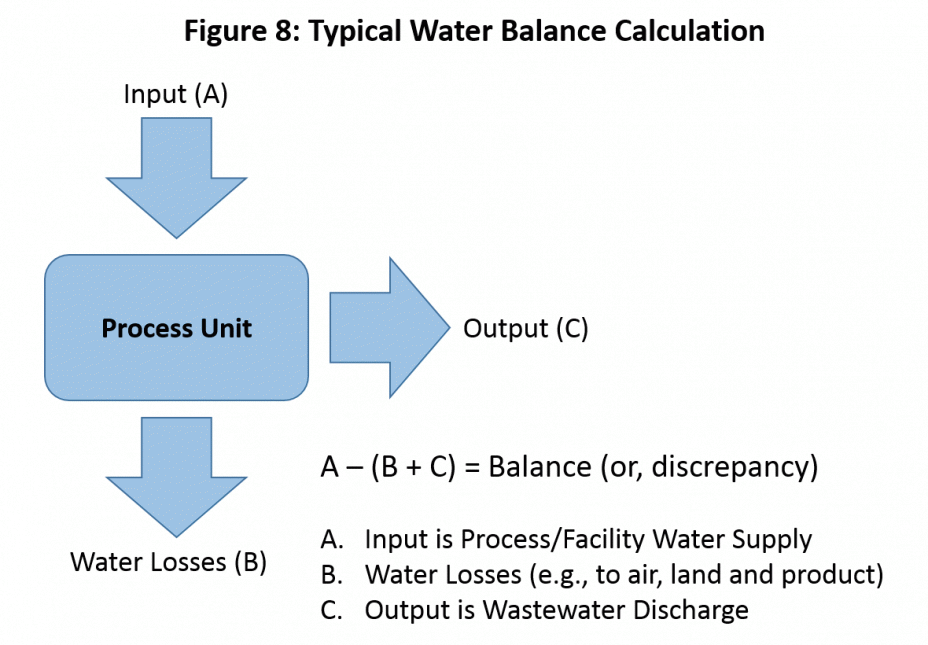 When creating a water balance, make note of all water use in the facility and track water flows from the source through all operations at the facility to water losses and outputs including evaporative losses, input to products, and wastewater discharge. All uses of water in a facility should be included in a water balance. Common end uses of water are discussed in Chapter 2, and include processing and auxiliary
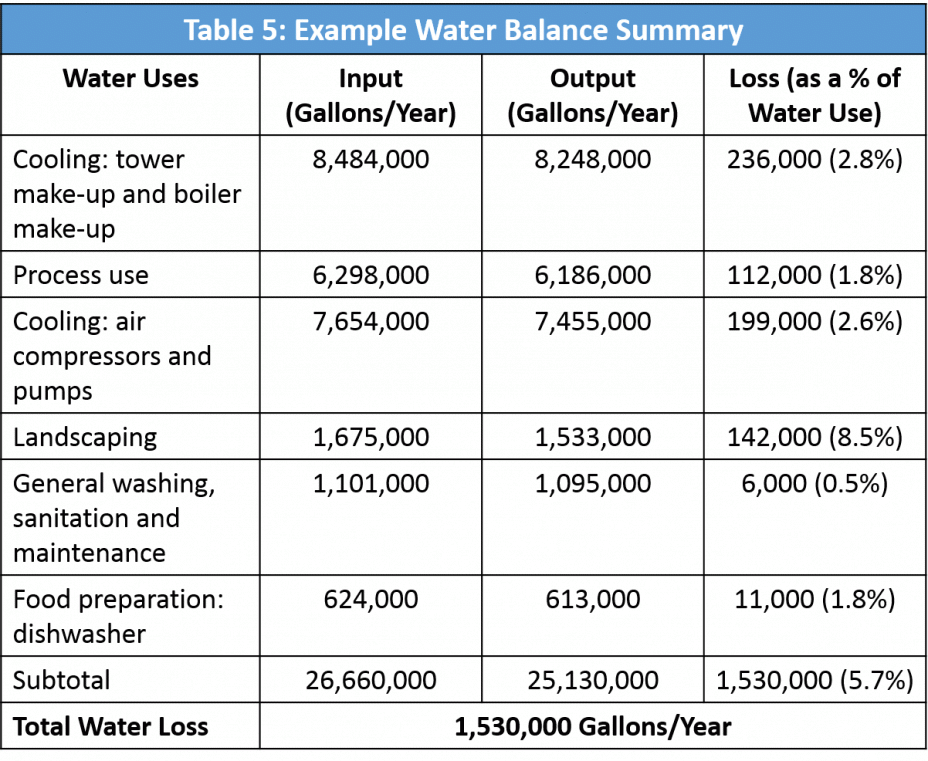
 ![]() processing, heating and cooling, indoor domestic use, and landscape irrigation. The water balance should capture all of the flows into and out of each process at the facility, and should verify that there is a balance between flows in and flows out. Compare the estimated
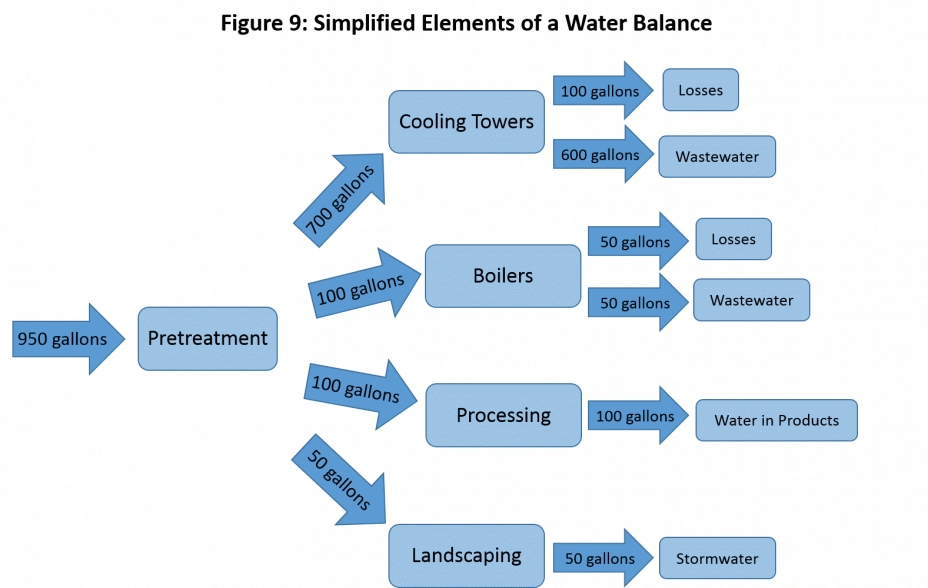
processing, heating and cooling, indoor domestic use, and landscape irrigation. The water balance should capture all of the flows into and out of each process at the facility, and should verify that there is a balance between flows in and flows out. Compare the estimated ![]() or measured total of end uses with the incoming metered amount. Be sure to account for losses, such as evaporation, as well as wastewater discharge. The Simplified Elements of a Water Balance figure (Figure 9) below shows an example of the components of a simple water balance for a facility, while Table 5, Example Water Balance Summary, presents overview information on water use by process from a water balance.
or measured total of end uses with the incoming metered amount. Be sure to account for losses, such as evaporation, as well as wastewater discharge. The Simplified Elements of a Water Balance figure (Figure 9) below shows an example of the components of a simple water balance for a facility, while Table 5, Example Water Balance Summary, presents overview information on water use by process from a water balance.
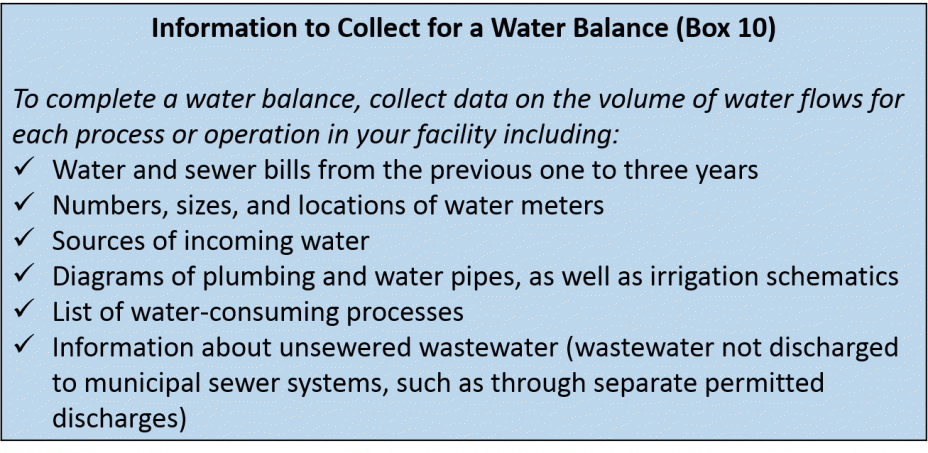
 The process of putting together a water balance helps to capture a baseline of a facility’s current water usage (see Box 10). A water balance will help you identify sources of risk such as leaks and compliance concerns. Some companies choose to conduct water balances at varying levels of detail on a regular basis in an effort to locate ways to reduce water use and discover hidden water-savings dividends.
 Benefits of compiling a water balance include:
- Ability to identify processes that present the best targets for reducing water use
- Establishment of baseline water use data, from which improvements in efficiency can be benchmarked
- Creation of a tool with which to compare different water-efficiency improvement strategies
 An outside expert could be the best option to help conduct a water balance for some facilities. Contact your local water utility to ask whether it provides assistance for developing water balances; some utilities provide this service (or related services) free of charge. In many cases, a water balance can make it easy to identify steps to take to improve water efficiency. If there is a discrepancy between the input and output of water in your facility that becomes apparent after preparing your water balance, you might use that baseline to create a target future state that reduces the discrepancy by a set percentage. Several of the resources in Appendix A provide information about developing water balances, more involved assessments such as water footprints (see Box 11) and audits, and benchmarking and tracking tools such as ENERGY STAR’s Portfolio Manager.
More Detailed Water Audits, Water Assessments, and Water Footprints
In the event that a more detailed assessment of water use and risks is desired, an organization could consider conducting a water audit, water source vulnerability assessment, and/or water footprint analysis. While the results of these methods can inform the use of Lean to improve facility water efficiency, they are typically conducted as stand-alone efforts that can require substantial effort and investment. These methods are only described briefly below in this toolkit.
 A water audit typically involves a more comprehensive, time-intensive, facility-wide effort to assess a facility’s water use and efficiency improvement opportunities. A water audit may include activities described in this toolkit, such as metering and baselining, but it typically focuses on the full facility in a discrete, brief period (e.g., during a 1–2 week effort). You may choose to follow specific standards when conducting the audits, such as those of the American Society of Heating, Refrigerating, Cooling and Air-Conditioning Engineers.
 A water source vulnerability assessment generally looks outside of the facility at factors that have potential to affect the supply and cost of water that the facility and surrounding community relies upon. This assessment can help a facility determine the risks of water supply disruptions or costs fluctuations and identify steps that may help to reduce these risks.
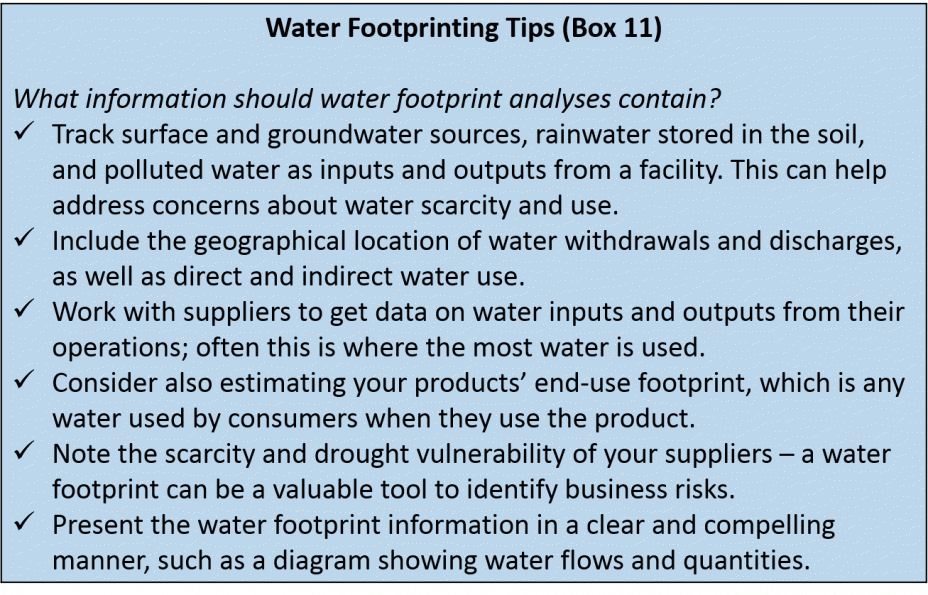
 Water footprinting analysis refers to the total volume of fresh water that is used directly and indirectly to run and support the business, encompassing both water use within an industrial facility and throughout its supply chain. You might consider conducting a water footprint to gain a more complete understanding of the places where water is used inefficiently throughout your supply chain—upstream among suppliers and downstream by users of the facility’s output or products. While a water footprint can be time-consuming and difficult to prepare, it can be helpful in identifying improvement opportunities throughout the supply chain. Box 11 provides tips for conducting water footprint analyses, while chapter 5 discusses strategies for engaging suppliers to reduce water use and risks.
Water Waste and Value Stream Mapping
![]() Like water balances, value stream mapping can be a powerful tool for identifying water waste and savings opportunities. Value stream mapping is a Lean method for creating a visual representation of the flows of information and materials across all the activities involved in producing a product for a customer. In a value stream mapping event, two maps are developed: a map of the current state showing key data about existing processes and a future state map showing changes that can be made to reduce waste. Value stream maps can be developed at the value-stream level (e.g., for a product family) or at the process level after your team has selected a process to investigate more closely.
Like water balances, value stream mapping can be a powerful tool for identifying water waste and savings opportunities. Value stream mapping is a Lean method for creating a visual representation of the flows of information and materials across all the activities involved in producing a product for a customer. In a value stream mapping event, two maps are developed: a map of the current state showing key data about existing processes and a future state map showing changes that can be made to reduce waste. Value stream maps can be developed at the value-stream level (e.g., for a product family) or at the process level after your team has selected a process to investigate more closely.
By adding water data to value stream maps, value stream mapping can help you:
- Gain a better understanding of where the greatest water waste occurs
- Identify areas where improvements can be made to reduce excess water use and other wastes
- Develop an implementation plan for process improvements to reduce wastes in the value stream, prioritizing water efficiency projects alongside other Lean and environmental projects
- Quantify the expected savings from implementing those improvements
- Create a culture of efficiency as team members from supervisors to floor workers become engaged in cutting waste
Adding Water Waste to Value Stream Maps
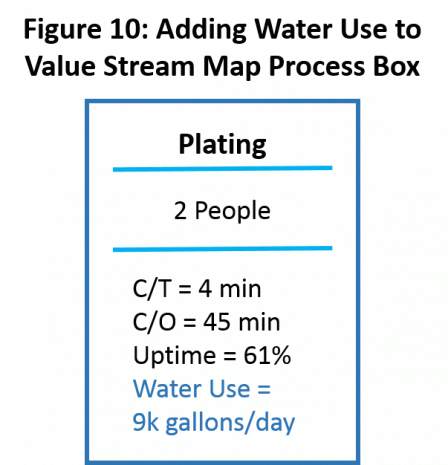
Value stream maps depict all the activities in a value stream or a process, along with key metrics that primarily relate to time. Incorporating water considerations into a value stream mapping exercise is as simple as adding the amount of water used at each step onto the value ![]() stream map. Figure 10, Adding Water Use to Value Stream Map Process Box, shows a process data box with data on the water use by a particular process included. Costs associated with the water used by each process or process step could also be added; however, to be fully representative, these costs should include indirect costs such as those for support functions.
stream map. Figure 10, Adding Water Use to Value Stream Map Process Box, shows a process data box with data on the water use by a particular process included. Costs associated with the water used by each process or process step could also be added; however, to be fully representative, these costs should include indirect costs such as those for support functions.
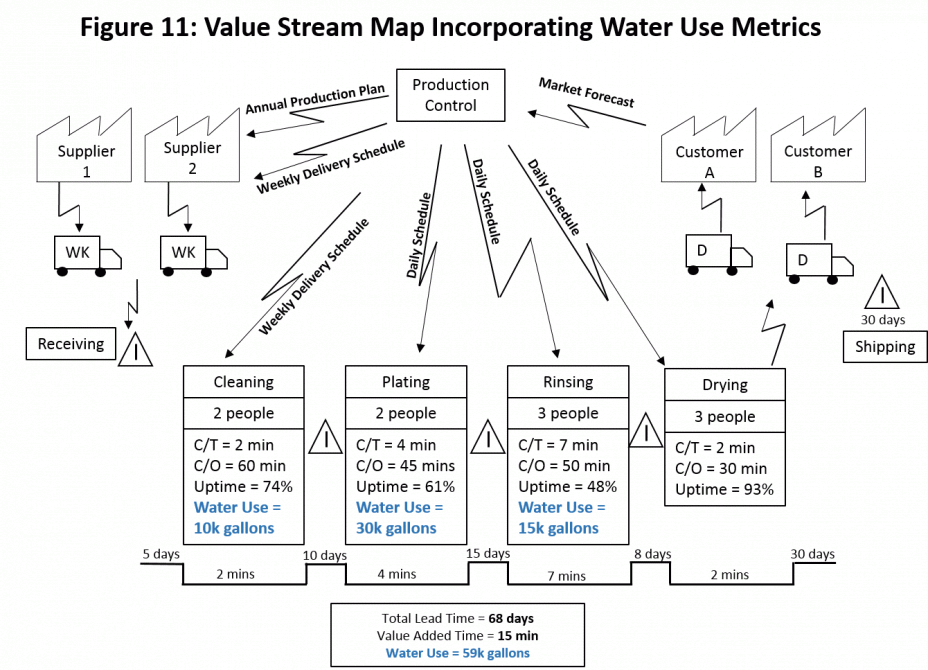
![]() Figure 11, Value Stream Map Incorporating Water Use Metrics, shows an example of a current state value stream map that has been modified (with additions in blue) to include data on the amount of water used at each step. Most activities that consume water are tracked in the map; however, note that this map does not include water loss as a result of leaks and evaporation or other losses that can occur between process steps.
Figure 11, Value Stream Map Incorporating Water Use Metrics, shows an example of a current state value stream map that has been modified (with additions in blue) to include data on the amount of water used at each step. Most activities that consume water are tracked in the map; however, note that this map does not include water loss as a result of leaks and evaporation or other losses that can occur between process steps.
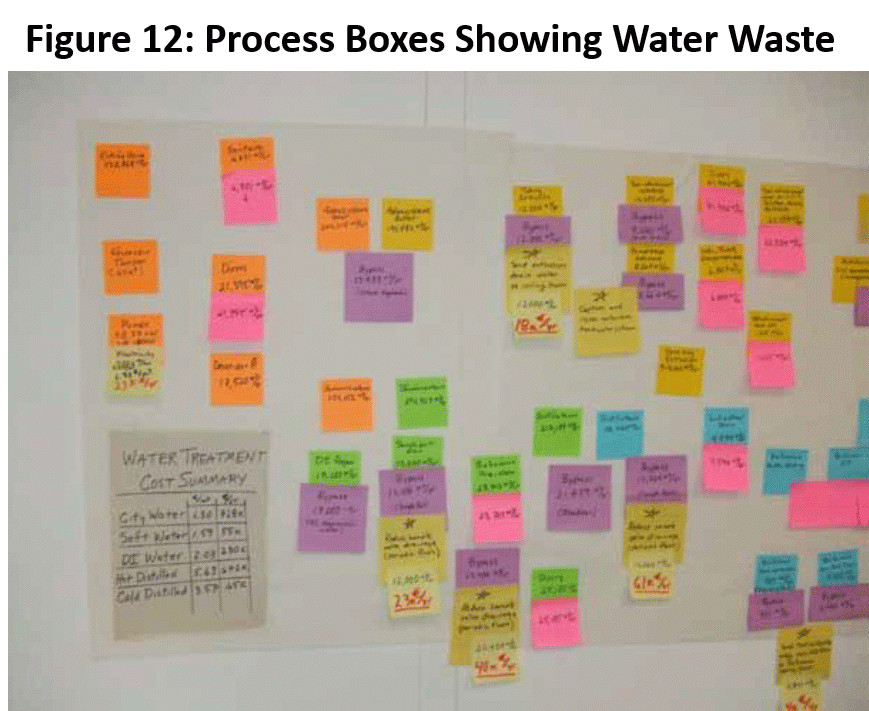
 Many teams develop value stream maps using sticky notes to represent each step in a process. This enables team members to move things around easily and helps them create the most accurate picture of the process possible.
To create a visual representation of the areas in the value stream map that use the most water, try using different colors of sticky notes for high- and low-water using steps. See Figure 12 for an example of the use of sticky notes to create a value stream map, with water data added to several of the notes.
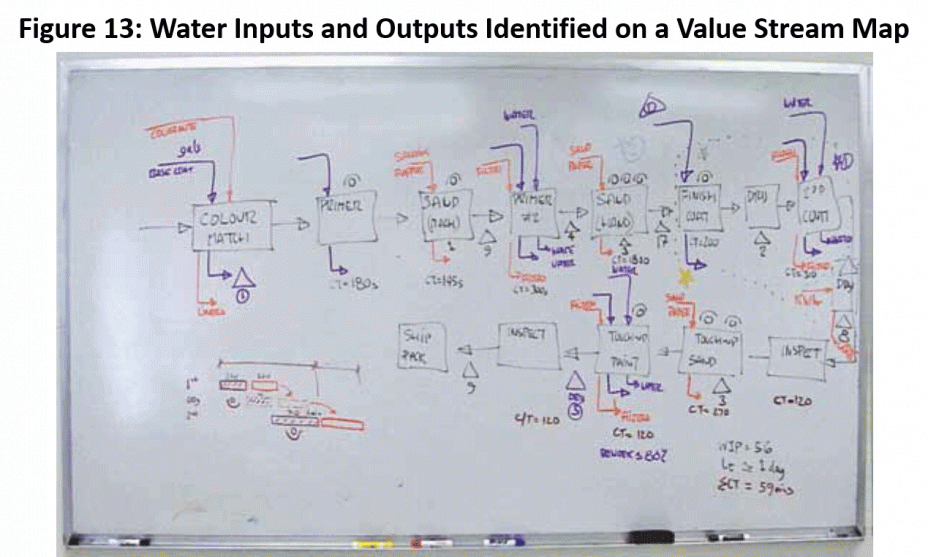
 Another way to show water inputs and outputs associated with your facility’s processes is by drawing lines into and out of each process data box on your value stream map. In Figure 13, the red circles show where water and wastewater flows have been identified; other waste streams are identified as well. See EPA’s Lean and Chemicals Toolkit for more information on this approach.
 After creating a current state map, your value stream mapping team will create a future state map that envisions ways to eliminate waste in the value stream and identifies areas for future process improvement projects, such as kaizen events or just-do-its (described in the next chapter). With water data included on the current state value stream map, your team will be able to easily identify opportunities for increased water efficiency and can work together to identify, prioritize, and develop an implementation plan for improvement projects that can meet both Lean and environmental goals. Incorporating water waste into value stream mapping allows water efficiency projects to be combined with and considered together with other operational improvements.
The implementation plan is a key product from the value stream mapping event. Take care to develop an implementation plan that details the steps to carry out the improvements you have identified, being sure to assign responsibility for each step of the plan. Consult with facility EHS staff and permitting authorities before making any changes that could affect facility emissions or wastewater discharges.
For more information on adding environmental metrics to value stream maps, see Chapter 3 of EPA’s Lean and Environment Toolkit.
Root Cause Analysis
When you find a water waste in your facility, whether during a gemba walk or a value stream mapping exercise, it’s important to ask, “Why did ![]() this happen?” There is a set of Lean tools that can help you answer this question. Root cause analysis is the process of identifying a problem and working through possible components to identify the most basic reason why the problem is occurring. Once the cause of the problem is identified, you can prevent its recurrence. Two tools of root cause analysis include fishbone diagrams and the “5 Whys” approach.
this happen?” There is a set of Lean tools that can help you answer this question. Root cause analysis is the process of identifying a problem and working through possible components to identify the most basic reason why the problem is occurring. Once the cause of the problem is identified, you can prevent its recurrence. Two tools of root cause analysis include fishbone diagrams and the “5 Whys” approach.
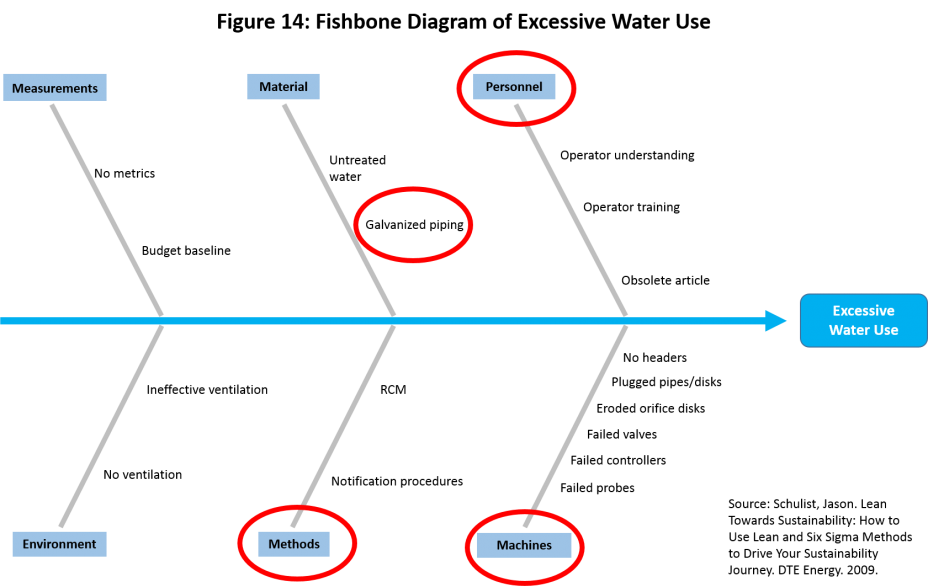
![]() Explore water waste you’ve found in a Fishbone Diagram (also known as an Ishikawa Diagram), which shows potential causes of a problem by grouping causes into major categories to identify the source of inefficiencies. To investigate water waste using a fishbone diagram, first identify the specific problem you wish to investigate; perhaps a spike in water use at the facility, or a leaky pipe or valve. Write the primary problem you wish to investigate in the head of the diagram, usually on the right side. The “bones” of the diagram represent groupings of potential causes of the problem; common categories include the following:
Explore water waste you’ve found in a Fishbone Diagram (also known as an Ishikawa Diagram), which shows potential causes of a problem by grouping causes into major categories to identify the source of inefficiencies. To investigate water waste using a fishbone diagram, first identify the specific problem you wish to investigate; perhaps a spike in water use at the facility, or a leaky pipe or valve. Write the primary problem you wish to investigate in the head of the diagram, usually on the right side. The “bones” of the diagram represent groupings of potential causes of the problem; common categories include the following:
- Measurements
- Material
- Man (or Personnel)
- Methods
- Machines
- Environment
![]() Along each grouping, many detailed sub-causes are listed. Figure 14 on the next page, Fishbone Diagram of Excessive Water Use, shows an example of a fishbone diagram that one facility used to assess its water use.
Along each grouping, many detailed sub-causes are listed. Figure 14 on the next page, Fishbone Diagram of Excessive Water Use, shows an example of a fishbone diagram that one facility used to assess its water use.
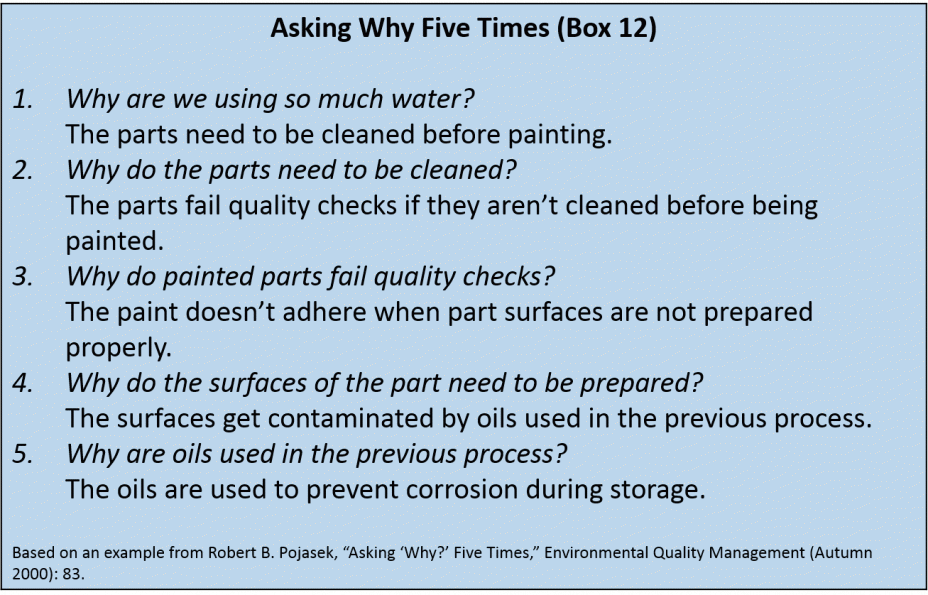
![]() Another root cause analysis tool is the “5 Whys” technique. The approach uses a systematic questionnaire technique to search for root causes of a problem. Simply ask “Why?” when considering the primary problem, “Why is excessive water used here?” Follow up with additional “Why?” inquiries until you drill down to the root cause of the problem. The goal of the exercise is to pursue further until the root of the problem is identified. Be aware that there is sometimes more than one cause of a problem.
Another root cause analysis tool is the “5 Whys” technique. The approach uses a systematic questionnaire technique to search for root causes of a problem. Simply ask “Why?” when considering the primary problem, “Why is excessive water used here?” Follow up with additional “Why?” inquiries until you drill down to the root cause of the problem. The goal of the exercise is to pursue further until the root of the problem is identified. Be aware that there is sometimes more than one cause of a problem.
 Completing a root cause analysis exercise should be a precursor to brainstorming potential solutions to water waste problems at your facility. By using these tools, you can ensure that you address the root cause of the problem first, instead of merely treating the symptoms. Chapter 4 explains how to take the knowledge about your facility’s water use that you have gained through the tools listed in this chapter and apply that knowledge to reduce water use.
Footnotes
1 North Carolina Department of Environment and Natural Resources, Water Efficiency Manual for Commercial, Industrial and Institutional Facilities, May 2009.
Toolkit Navigation
- Contents & Acknowledgements
- Executive Summary
- Preface
- Chapter 1: Introduction
- Chapter 2: Water Use and Water Waste at Industrial Facilities
- Chapter 3: Finding Water Waste on the Factory Floor
- Chapter 4: Lean and Water Efficiency Improvement Strategies
- Chapter 5: Lean and Water Beyond the Factory Floor
- Chapter 6: Conclusion
- Appendix A: Water Efficiency Resources and Technical Assistance Providers
- Appendix B: Water Cost Calculator
- Appendix C: Water Unit Conversions and Calculations
- Appendix D: Water Efficiency Opportunity Checklist
- Appendix E: Glossary of Water Terms

